 I used blue, yellow and pink fabric, thread and scissors. The pattern is available here. Diana
Tuesday, May 31, 2011
Owl Scissor Holder For Teacher
My grandson needed a gift for his teacher who loves to sew and this is what my daughter asked me to make for her. Done on my embroidery machine, it is easier than it looks. I used blue, yellow and pink fabric, thread and scissors. The pattern is available here. Diana
I used blue, yellow and pink fabric, thread and scissors. The pattern is available here. Diana
Monday, May 30, 2011
Pee Pee Tee Pee
Now that's a title that should grab your attention! You all probably know what these are for but if you don't check out this tutorial here. I think they are the funniest things I have ever seen. I made them in green and blue and added a simple ribbon tag to make them easier to grab. Just throw them in the washer and dryer and they are as good as new. No mess, no worries.
 This pic makes them look more like something else entirely.......ahem. Diana
 I made them in green and blue and added a simple ribbon tag to make them easier to grab. Just throw them in the washer and dryer and they are as good as new. No mess, no worries.
 This pic makes them look more like something else entirely.......ahem. Diana
Friday, May 27, 2011
vintage Bird Cage Card
sometimes a card just designs itself. That was the case with this little gem. I went in with no idea how this one was going to turn out. I just kept pulling out punches and die cuts until it just "felt" right. Diana
Diana
 Diana
Diana
Thursday, May 26, 2011
Butterfly Kisses
This card is for a sweet little girl and had to match her sunny personality. 
 The butterflies are attached at their bodies only with glue dots. This way their wings are free to flutter. Diana

 The butterflies are attached at their bodies only with glue dots. This way their wings are free to flutter. Diana
Saturday, May 21, 2011
CTR Cookies
Do you need a cookie for a child's baptism? This CTR shield (choose the right) is perfect for just such an occasion! The cookie is about 4 inches tall. I first outlined the blue edge and let it sit for a minute. Then I flooded the edge with this pretty blue.
 The center is flooded in a pale gold and while it was still wet I piped the CTR (wet on wet) so the letters are flat on the surface. Hope these inspire the children (and adults) to choose the right! Note: added April 2012-You can purchase a Ctr cookie cutter from this etsy shop. I don't have this one but it looks very similiar to the one I have and I haven't seen any other ones availble for sale.
Diana
 The cookie is about 4 inches tall. I first outlined the blue edge and let it sit for a minute. Then I flooded the edge with this pretty blue.
 The center is flooded in a pale gold and while it was still wet I piped the CTR (wet on wet) so the letters are flat on the surface. Hope these inspire the children (and adults) to choose the right! Note: added April 2012-You can purchase a Ctr cookie cutter from this etsy shop. I don't have this one but it looks very similiar to the one I have and I haven't seen any other ones availble for sale.
Diana
Friday, May 20, 2011
Soooo Worth the Effort!

My eight year old (as of today) picked the most ridiculous cupcake picture he could find for his birthday. It took everything I had in me to not talk him into something, anything, else. I am so glad he picked these. I made minis. I think that standard sized cupcakes would have gone tons faster. They have a yummy marshmallow icing under that layer of dark chocolate. The only problem I ran into was my lack of owning a hand held mixer-Luckily my friend does. I haven't needed one in the 12 years I have had my stand mixer...I was just on amazon browsing for a new hand mixer.
Recipe here.
There are lots of steps, but it is soooo worth the effort, trust me! Besides being a bit time consuming, they came together without a hitch.
Wednesday, May 18, 2011
Stache Cookies
The mustache craze is TOOOO cute! I may be a little late jumping on it but yesterday I found a cookie cutter that screamed mustache!!! It was actually a pair of lips, but if you turned it upside down and squeezed it a little thinner......it was a perfect mustache.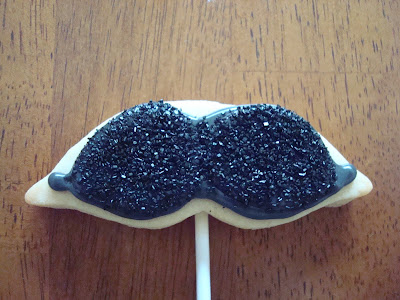 To get it on a stick, I sandwiched a lollipop stick between two raw cookies and baked it like normal. Let cool completely or the stick will wiggle loose. Outlined and flooded in black glace icing, the cookies were then covered in black sanding sugar.
 Why does a cookie mustache crack me up so much!!!!! Diana
 To get it on a stick, I sandwiched a lollipop stick between two raw cookies and baked it like normal. Let cool completely or the stick will wiggle loose. Outlined and flooded in black glace icing, the cookies were then covered in black sanding sugar.
 Why does a cookie mustache crack me up so much!!!!! Diana
Tuesday, May 17, 2011
Robot Scripture Covers
I've done some crazy scripture covers but these have got to be the craziest! Robots!
 That's what the boy asked for so that's what he is getting. I bet there isn't another kid with scriptures quite like these.
 These papers were all part of a coordinated pack. I fussy cut out the robots and shadows.
 Let's see if he likes these as much as I do! Diana
 That's what the boy asked for so that's what he is getting. I bet there isn't another kid with scriptures quite like these.
  These papers were all part of a coordinated pack. I fussy cut out the robots and shadows.
 Let's see if he likes these as much as I do! Diana
Monday, May 16, 2011
CTR Baptism Towel
We are having another baptism in our family, this time a grandson, and I love making and giving a baptism towel. On this blog we have shown several different versions and here is one more.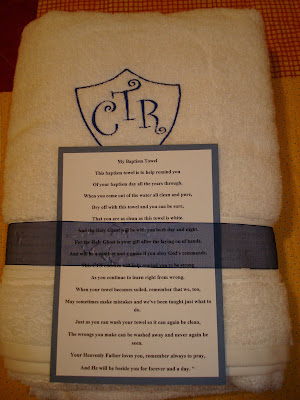 I found an adorable CTR shield that was perfect! Love the font! Unfortunately it is no longer available.....so sad......
 A total of about 10 minutes and a very special gift is totally completed. Diana
 I found an adorable CTR shield that was perfect! Love the font! Unfortunately it is no longer available.....so sad......
 A total of about 10 minutes and a very special gift is totally completed. Diana
Friday, May 13, 2011
Ice Cream Cookies!
Drippy ice cream cones.....so messy, unless that ice cream cone is a cookie! I was given this new cookie cutter for mother's day and couldn't wait to use it.
 I also had been wanting to try polka dots using wet on wet. It worked! I even used the same technique for the waffle cone too. These fun cookies look so refreshing for the unusually hot weather we are having. Yum! Diana
 I was given this new cookie cutter for mother's day and couldn't wait to use it.
 I also had been wanting to try polka dots using wet on wet. It worked! I even used the same technique for the waffle cone too. These fun cookies look so refreshing for the unusually hot weather we are having. Yum! Diana
Thursday, May 12, 2011
Dish Drainer Quilt
Have you gotten your recent copy of MaryJanesFarm yet? Well if you have, did you see the darling dish drainer quilts? When I saw them, I knew I had to make one right away. So clever too, they take the place of those nasty plastic drainer under a dish rack! No more icky and difficult to clean drainer! I don't use one at our house, but with the cabin nearing completion, I will definitely need one there! Basically, it is a tiny quilt! Without any hand quilting!
 I also put a running chicken on mine (reminds me of our "girls" when they see us coming into the barnyard). I can't remember where I got the design.....sorry. The picture above shows more of the goodies I made or bought this week for the cabin.
 I did machine stitch around the chicken to add a little stability to the quilt. Be sure and check out the original (with tutorial) in this month's MaryJanesFarm magazine! Diana
 Basically, it is a tiny quilt! Without any hand quilting!
 I also put a running chicken on mine (reminds me of our "girls" when they see us coming into the barnyard). I can't remember where I got the design.....sorry. The picture above shows more of the goodies I made or bought this week for the cabin.
 I did machine stitch around the chicken to add a little stability to the quilt. Be sure and check out the original (with tutorial) in this month's MaryJanesFarm magazine! Diana
 Wednesday, May 11, 2011
Angel Moroni Cookie
This cookie was so hard to photograph! Maybe it was the luster dust, but I kept getting a glare on it! This was the only one that came out but it is difficult to see the shape.
 I had bought this cookie cutter years ago while in Salt Lake and finally used it today. I didn't have any gold luster dust so I used copper instead. The icing was also copper color. I think these would be great for a baptism! Diana
 I had bought this cookie cutter years ago while in Salt Lake and finally used it today. I didn't have any gold luster dust so I used copper instead. The icing was also copper color. I think these would be great for a baptism! Diana
Tuesday, May 10, 2011
Tiny Turtles Cookies
The sugar cookies I did today were very very very tiny. And really funny too. I had to try out a new cookie cutter (turtle) and since I had the dough already going, I did a daisy in honor of the sunny day we had today.
 This turtle is about 1 inch tall so I can eat a lot of them! It was too hard to try to add detail to the shell so I put a sweet little heart on each one instead.
 The daisies were super easy and I put a sprinkle of sanding sugar on the centers (my aim is not that good as you can see!). Hmmm. I wonder what new cookie I could do next....... Diana
 I had to try out a new cookie cutter (turtle) and since I had the dough already going, I did a daisy in honor of the sunny day we had today.
 This turtle is about 1 inch tall so I can eat a lot of them! It was too hard to try to add detail to the shell so I put a sweet little heart on each one instead.
  The daisies were super easy and I put a sprinkle of sanding sugar on the centers (my aim is not that good as you can see!). Hmmm. I wonder what new cookie I could do next....... Diana
Sunday, May 8, 2011
Chicken Dish Towel
Time for another applique tea towel. This one has a funky chicken done in black, red and white. I purchased the design from SWAK.
 The towel is very sturdy and is in a small tan check pattern. This one should wear well and put a smile on your face every time you use it! Diana
 I purchased the design from SWAK.
 The towel is very sturdy and is in a small tan check pattern. This one should wear well and put a smile on your face every time you use it! Diana
Saturday, May 7, 2011
Scored!
I didn't make this quilt (like I even could) but it was so cute I had to post it. I bought it as a charity auction last night! EVERYTHING is hand sewn!
 It has a few stains but if you were that old you'd have stains too!
 So sweet and it will look great folded up on a shelf, until it finds a better place to shine. Diana
 EVERYTHING is hand sewn!
 It has a few stains but if you were that old you'd have stains too!
 So sweet and it will look great folded up on a shelf, until it finds a better place to shine. Diana
Thursday, May 5, 2011
Bee Happy Cookies
Could these little cookies be any cuter? And the bees are so tiny (that's a luncheon plate in the picture) at less than 2 inches wing to wing.  Everything has been outlined in black and then flooded with really thin glace. It is hard to see but all the stripes (on the hive and on the bee) were done in wet on wet. I hadn't really tried that before (successfully anyway) and really like how the stripes melt into the other icing with no dimension.
 We lost all but two of our hives this last winter so these may be the only bees we will see until the new shipment comes in. Diana
 Everything has been outlined in black and then flooded with really thin glace. It is hard to see but all the stripes (on the hive and on the bee) were done in wet on wet. I hadn't really tried that before (successfully anyway) and really like how the stripes melt into the other icing with no dimension.
 We lost all but two of our hives this last winter so these may be the only bees we will see until the new shipment comes in. Diana
Mod Flower Garment Bag
I finally replaced my old garment bag! The old one was made of vinyl (which I had tried to iron....come on, it had a lot of wrinkles! Now it just has some funky melted spots). Ugly. I had been wanting to make a new one but the cost of the quilted fabric kept giving me pause. Eventually the ugliness of the old vinyl one beat out the expensiveness of the new fabric.  My next issue was the granny like choices of quilted fabric at Joanns. Sooooo icky. But the back side of a patchwork looking one had this simple floral pattern. It would have to do. And using lime green as my accent fabric helped a lot.
 I put my first initial inside this cool flower. I think doing it in black is a fun.
 This loop on the back allows me to fold up the bottom and hook it over the hanger. Easier to carry that way.
 And there is a LARGE hidden pocket at the bottom for all the little things I need. I also made a shoe bag to match so I am all set for my next trip! NO more embarrassing vinyl! Diana
 My next issue was the granny like choices of quilted fabric at Joanns. Sooooo icky. But the back side of a patchwork looking one had this simple floral pattern. It would have to do. And using lime green as my accent fabric helped a lot.
 I put my first initial inside this cool flower. I think doing it in black is a fun.
 This loop on the back allows me to fold up the bottom and hook it over the hanger. Easier to carry that way.
 And there is a LARGE hidden pocket at the bottom for all the little things I need. I also made a shoe bag to match so I am all set for my next trip! NO more embarrassing vinyl! Diana
Wednesday, May 4, 2011
Cowboy Boot Speciment Art
Specimen art is so classy! Especially all those cool insects and other scholarly items! So what do I do? Cowboy boots! Yep.
 Set against the background of route 66 fabric, this kitschy art piece is so much fun and very tongue in cheek. Just right for a little boy"s room or country cabin.
 I used GG Embroidery Designs funny little boot. Done on felt they are too cute. The background is a sheet of scrapbook paper. The frame was left unstained but received a coat of gloss finish. This just cracks me up....I can't help it. Diana
 Set against the background of route 66 fabric, this kitschy art piece is so much fun and very tongue in cheek. Just right for a little boy"s room or country cabin.
  I used GG Embroidery Designs funny little boot. Done on felt they are too cute. The background is a sheet of scrapbook paper. The frame was left unstained but received a coat of gloss finish. This just cracks me up....I can't help it. Diana
Tuesday, May 3, 2011
Fresh Asparagus Quiche
I used today's asparagus harvest in a beautiful quiche. I have a favorite quiche recipe that I use all the time and it always turns out great. The fresh asparagus makes a nice addition. Heat oven to 400
Crust
 Heat oven to 400
Crust
1 1/4 cups of flour
1/4 tsp salt
1/3 cup chilled shortening
cold water
Mix flour and salt in bowl. Cut in shortening with pastry cutter until it forms crumbs about the size of peas. Add enough ice water, one tablespoon at a time, until pastry will hold it shape when pressed into a ball. Roll out on floured surface and place in pie pan. Set aside.
Filling
10 slices bacon, cut into small pieces
1/2 cup onion, chopped
about 15-20 stalks asparagus
1 1/2 cups grated Monterrey jack cheese
1 tablespoon flour
1/4 tsp salt
1/8 tsp pepper
3 eggs
1/2 cup cream
Fry bacon until crisp. Drain on paper towel. Saute onion in bacon grease until tender. Drain on paper towel. Discard grease. Cut 8 pieces of asparagus down to 4 inch sections. Chop remaining asparagus into one inch pieces. Cook all the asparagus in a small amount of water in a saucepan until barely tender. Drain. Mix bacon, onion, cheese, chopped asparagus, flour, salt and pepper in bowl and arrange in unbaked pie shell. Beat eggs and cream together and pour over the bacon mixture in the pie shell. Now arrange the 8 pieces of asparagus in a wheel spoke pattern on top of quiche. Bake at 400 for 30 to 35 minutes or until set. Let stand for about 10 to 15 minutes. This serves about 8 people. (Or 4 if they are big eaters!!!) Diana
Itouch Case
Guess what I got from my husband? An Itouch! I guess I have taken another step into the 21 century! That meant I HAD TO make a cute case for it! This is what I ended up with and I made a tutorial so you can make one too. I made my opening on the side, instead of the top, because it will be easier to access from my purse this way.
 Cut two 5 1/2 by 7 1/2 inch rectangles (this will be very snug if you have a one of those protective cases on your Itouch so you might want to add 1/2 inch!) from each fabric you have chosen. Now cut a piece of felt the same size. Layer with the felt on the bottom, and the two pieces of fabric with right sides together on top. Cut a piece of 1/8 wide elastic about 2 inches long.
 Pin the elastic between the two pieces of fabric, on one short side, in the shape of a loop.
 Pin all the layers together.
 Sew a scant 1/4 inch seam allowance all the way around the rectangle, leaving a two inch opening on the short end opposite the elastic. The fabric will want to creep so make sure you have pinned it well or use a walking foot.
 Trim the corners and turn right side out.
 Iron, making sure to get the corners nice and crisp. (cut the felt back a bit at the opening and turn the fabric there to match the finished edge)
 Edge stitch the short end with the opening closed.
 Fold the short edge without the elastic up (use your I touch as a guide) and pin. Edge stitch along both sides as shown above.
 Attach a button or other embellishment for the elastic to loop over. I used GG Embroider Designs stackable flower. I frayed the edges and used felt as the backing so it would be substantial. Then, using a button. I hand stitched the two layer flower on. Now I have a pretty case for my new toy. So much better than the ones you buy at the store! Diana

 Cut two 5 1/2 by 7 1/2 inch rectangles (this will be very snug if you have a one of those protective cases on your Itouch so you might want to add 1/2 inch!) from each fabric you have chosen. Now cut a piece of felt the same size. Layer with the felt on the bottom, and the two pieces of fabric with right sides together on top. Cut a piece of 1/8 wide elastic about 2 inches long.
 Pin the elastic between the two pieces of fabric, on one short side, in the shape of a loop.
  Pin all the layers together.
  Sew a scant 1/4 inch seam allowance all the way around the rectangle, leaving a two inch opening on the short end opposite the elastic. The fabric will want to creep so make sure you have pinned it well or use a walking foot.
 Trim the corners and turn right side out.
 Iron, making sure to get the corners nice and crisp. (cut the felt back a bit at the opening and turn the fabric there to match the finished edge)
 Edge stitch the short end with the opening closed.
 Fold the short edge without the elastic up (use your I touch as a guide) and pin. Edge stitch along both sides as shown above.
 Attach a button or other embellishment for the elastic to loop over. I used GG Embroider Designs stackable flower. I frayed the edges and used felt as the backing so it would be substantial. Then, using a button. I hand stitched the two layer flower on. Now I have a pretty case for my new toy. So much better than the ones you buy at the store! Diana
Subscribe to:
Posts (Atom)


