Friday, July 30, 2010

Tutu

I made a tutu for a friend of mine last night. It took about 1 hour and is really easy to make. The finished product is adorable.First cut strips about 1" in width of tulle. Length will vary depending on child's size, but for this one (2 year old) the length was around 18"(final length after attaching was 9"). Then you need to cut elastic (1/2 in. width is what I used) to the circumference of the child's waist. Sew elastic to create circle waistband. Now you will create a loop with a strand of tulle around elastic and put ends through.
Pull the loop tight and continue all the way around the elastic.
The final product takes about 1-1.5 yards of tulle (depending on length of finished product). However the more you put on it, the fluffier it gets. So easy and virtually no sewing. What little girl doesn't like to dress up.

Cindy

Wednesday, July 28, 2010

Batty Soap

Water soluble paper is so fun! It is great to use in melt and pour soap making. First decide what size image you need for your mold. I didn't want to waste paper so I cut and pasted a lot of images on to my document and then printed it. Check out some of these cool graphics all of which came from The Graphics Fairy. After I printed it on the water soluble paper, I sprayed it with hair spray to help set the ink.

Next I cut out two images and set them aside. I melted some clear glycerin soap base, spraying with rubbing alcohol to remove the bubbles, and added just a dot of blue coloring. I then poured a thin layer in the molds and let them set for a few minutes. Laying the image face down into the mold, I pressed it in just to embed it. Next I melted the white soap base, cooled it to 130 degrees and added fragrance. I sprayed a little alcohol on the clear soap in the mold and then carefully poured the white soap on top of the clear. I sprayed it again with the alcohol and let it set for at least 6 hours.

This was the hard part.....waiting!

I removed the soap from the molds and trimmed up the edges and look how cool.

This bat is the same one Jennifer used in her picture on Monday's post.
This lock and key is a bit too busy but I still am amazed at how much detail there is! This soap making is fun fun fun. Diana

Tuesday, July 27, 2010

Another CTR Towel

Taking a clue from Jennifer's earlier appliqued CTR towel, I did this one on my embroidery machine. I am still learning how to operate it! This design is actually two designs combined. The shield was online and the alphabet is built into my machine. I really love the simplicity of the design.
One cool thing I learned...water soluble stabilizers is laid on top of the towel so the terry cloth doesn't cause problems and it tears away very easy so I didn't have apply water to it! Diana

Monday, July 26, 2010

Halloween Decoration

I love this antique bat.

I was going to wait until it got closer to Halloween to make this, but I just couldn't help myself.

I used brown craft paper that I had on a roll and cut it to fit through my printer. I tore the around the edges and wrinkled them up and bit. I finished it off with some brown ink smears.
It is mounted in a floating picture frame. This is exactly why I love Halloween!
~Jennifer

Sunday, July 25, 2010

Thank yous


I wanted to do something special for our primary teachers since they have been saving me the last few weeks in primary. Our president just moved and the other counselor is on vacation for the next few weeks. It has been a little hectic but doable with our teachers. I saw these ideas I knew I needed to stock up on Swedish Fish. I did discover that pillow boxes are hard to come by in Central Ohio, so I had to improvise with round goodie bags.
~Jennifer

Saturday, July 24, 2010

Little Cabin In The Woods Soap

Felted soap, I had NEVER heard of it....til last week when I went to http://soap-queen.blogspot.com/ and saw the cutest little bars! It is like having a washcloth around your soap. If you are still having trouble imagining this, think of what happens when you put a wool sweeter in the washer by mistake. Here is my first try at it. I used store bought soap which worked just fine and that I knew had a scent my husband would use. None of that sissy stuff for him! Then after the water felting process (messy) I needle felted the images of a log cabin in the woods on the front. So fun and therapeutic. Diana

Friday, July 23, 2010

Dollar Store Notebook

A place to write one's dreams...whether it be a journal of gratitude or a "someday list" of craft projects, our thoughts deserve a pretty place to land. This was a dollar store notebook that I carefully removed the wire binding from. Then I printed the image from Graphics Fairy on cardstock, adding the word NOTES from printshop, and glued the cardstock to the front cover. A little black and brown ink softened the edges making it look like it has been around for a while! Next I punched all the holes and re threaded the wire binding. The daisy was given a little ink on the tips of the petals and attached with glue dots. Easy to put together and oh so inexpensive! Diana

Tuesday, July 20, 2010

Soapsicle

Doesn't this look cool and refreshing? But don't be fooled into taking a bite...it's soap! I got this idea from http://thegreenbeanscrafterole.blogspot.com/! I actually had done some soap crafting with my nieces last week and had the tiniest bit of colored soap left over in the measuring cup. I poured it into a dollar store popsicle mold and let it set up just a bit before I slipped in the stick.
My only tip is that a mold with some flexibility would have been better! You should have seen me trying to get that popsicle out.
Diana

Monday, July 19, 2010

Girly Bows

First attempts at something can be pretty frustrating. And these hair bows were no exception! I know I can do better but I guess these came out OK.... I did learn a few tricks that will definitely make the next ones go easier. I watched a few videos but the bows were a lot harder to manipulate than the lady made it seem.
This is my favorite cuz it went together the easiest!
These are little tuxedo bows!
Simple bow but I like the colors. Another tuxedo bow. I cut off the shanks of all the buttons to make them lay flat. Each bow is attached to an alligator clip and has sure grip strips also. I will attempt these again so stay turned to see how it goes.......Diana

Old Clock Into Shadow Box

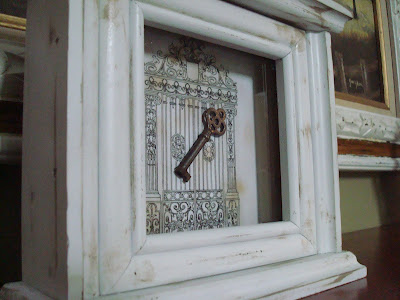
We have had this clock for a long time. It wasn't very attractive but it did keep good time. Then it finally quit. On the way to the trash can I took a second look at it and realized it would make a great shadow box! Now I just needed something to go in it. I dug through some odds and ends and found an old key from the same auction that I got all that silverware from. So I took the clock apart, masked the glass.(next time remember to mask the back of the glass too!!!!) and then got out the spray paint.
I painted the wood white, sanded some paint off for wear and then dry brushed on a little brown paint. Next came a coat of matte sealer. For the inside I printed off a copy of an antique looking iron gate from The Graphics Fairy which I inked heavily so it looked like parchment. Lastly I attached the old key with glue dots and closed the back up.
Here it is on the mantle. I really like the distressed look!
A side view gives you a better sense of the depth of the box. Cost? Just the paint which I already had! Diana

Silver Spoons and Sundflowers

You've seen them before, vintage spoons turned into plant marker, but I still had to post the one I did! This spoon is part of the auction find from last month and was too corroded to use at the table. So I hammered it flat and stamped in the message. I made the sunflower seed packet to give away with the marker!
Here is the closeup of the spoon's flattened bowl. I off set the letters because I knew I wouldn't be able to get them straight anyway! The letters stand out more if you rub some permanent ink into them.This spoon is huge. I can't wait to stick it in the ground! Diana

Sunday, July 18, 2010

Summer Storms

I found this great tutorial for this pillowcase dress on The Polkadot Chair . I love it! It was easy and quick to make and has beautiful detailing. There isn't a better dress for dancing in an afternoon rainstorm.Bow ties are all the rage right now in our church. Eli has a friend who is 14. He hangs out with him every week while Abby is at piano. He always wears bow ties, and Eli needed one too. I had extra fabric left over from Abby's dress that would be perfect. I adapted THIS PATTERN. I used the general outline of the tie and then added elastic to the neckline portion for comfort. Plus, now I don't have to get online to figure out how to tie it every Sunday morning because I can just slip it on and off. You can find great directions on how to tie one on www.youtube.He loves it so much he requested a red one too! They only took about 15 minutes to make, so why not? Jennifer

Saturday, July 17, 2010

Warm Fuzzies

It is my turn to do Sharetime at church and my daughter told me about the Warm Fuzzies Jar from last year's General Conference talk. Since we are talking about following Jesus' example of doing good I resurrected the idea. But went a little nuts with the decorating. Of course. We will fill the jar with good deeds (pom poms) and record the deeds in this small book I made with the Zutter. Then when we have filled both, we will give it to the Bishop as a gift from the children.
I nipped a little off one side of the pom poms so they could lay flat on the book. Lots of inking and I stamped the words using clear letter stamps.
Light weight index cards cut down to fit the book were just the right weight to hold up to the little hands that will be writing in this book. Diana

Cupcake Box

Let me start by confessing that the cupcake is not homemade and therefore unworthy of a post but...these boxes are so cool I had to show them. They are available on Esty and make even a store bought cupcake look fabulous! It just takes some folding and tucking and a little ribbon and that's it!
The bottom is two pieces and holds the cake firmly. This one went to a sweet little lady in a rest home. Diana

Goodwill Frames

I found these really ugly frames at Goodwill this week. Yes that is red velvet glued to the center!!! But they had a lot of detail in the plaster and were real cheap....99cents each! I tore them apart and then let them sit for a few days til I knew what to do with them.
I saved every bit, except the velvet, and got out the spray paint.
The finish is real rough so I knew a smooth finish wasn't going to happen.
A few coats of white matte finish spray paint.
I used scrapbook paper mounted on foam tape. Black ink around the edges of the paper and, because the white paint was a little stark, I inked the carving on the frame too. A coat of sealer will keep the ink from rubbing off. The "jewelry" in the center is a button from Walmart that I removed the shank from and glued to the paper.
The clear stones look great against the cream, black and white color scheme.
The pink is a little more off beat but I like the shock of color.
Here you can see the detail up close. The ink really helped these detail keep from disappearing in the sea of white. Diana

Friday, July 16, 2010

Fairy Garden

Ever since my friend Mary from http://windymeadowsfarm.blogspot.com/2010/04/fairy-garden.html did a cute blog on Fairy Gardens, I've been wanting to make one for myself. This past Monday I found some sweet wire accessories! Next came the pot and plants. Since it is late into summer, I didn't have as much to choose from but I am happy with the end result below. Some of the rocks are from Korea!
This gazebo has a candle chandelier hanging from it's ceiling.

A bridge to keep the fairies' feet dry when the creek is running.

The gardener left a few tools out!

Here is the new neighborhood...our front porch. Now we just need some little quests to drop by. Diana