 Diana
Diana
Monday, February 28, 2011
Acorn Pendant
Fimo acorn in epoxy pendant. Lots of bubbles too, but I am telling myself it makes it look more hand crafted. This guy is large too. About 1 1/2 by 1 inch. And it's irregular shape (due to a heat gun incident) does appeal to me! Looks a little like artisan glass! I have paid extra for bubbles in glass you know! Diana
Diana
Diana
Sunday, February 27, 2011
Shamrock Inchies
This is how I will be keeping some of my grandchildren pinch proof on St Patrick's Day. The designs are from GG Embroidery Designs.
 I made these hairbows out of white and green felt.
 I also made a couple pins for the boys to wear. Hope this keeps them all safe! Diana
 The designs are from GG Embroidery Designs.
 I made these hairbows out of white and green felt.
 I also made a couple pins for the boys to wear. Hope this keeps them all safe! Diana
Bunnies Under Glass
How funny is this!!! After putting a monkey brad on a necklace in an earlier post here, I started looking for other fun brads in the scrapbook section of the craft store. I found cute little bunnies and knew I could do something with them. Using a two part epoxy and mold, I embedded the brads (after snipping off the prongs) in the plastic and allowed to dry. The instructions on the epoxy explains how to do this very clearly but I still had trouble getting all the bubbles out. It said to use a blow dryer to bring them to the surface. I thought I could use the heat gun instead......on a plastic mold.......think about it for a minute. So now I have a slightly deformed mold in a few places........and still have bubbles.
 But, even with the bubbles, I love these little guys. I glued bails onto the backs and now I have the sweetest little pendants for spring. Diana
 Using a two part epoxy and mold, I embedded the brads (after snipping off the prongs) in the plastic and allowed to dry. The instructions on the epoxy explains how to do this very clearly but I still had trouble getting all the bubbles out. It said to use a blow dryer to bring them to the surface. I thought I could use the heat gun instead......on a plastic mold.......think about it for a minute. So now I have a slightly deformed mold in a few places........and still have bubbles.
 But, even with the bubbles, I love these little guys. I glued bails onto the backs and now I have the sweetest little pendants for spring. Diana
Saturday, February 26, 2011
Silver Paper Weight
A silver leaf paper weight.....very elegant! Plus it is inexpensive and easy to make! Now that we have a LARGE new craft store in our little town I have so many temptations every time I go in to get some little thing! The last time I went, I picked up a magnifying glass paper weight. I knew there was something I could do with it! I thought about mod podging it but the curve of the glass would make that difficult.
 Then I remembered I had some silver leaf! Perfect! I applied it to the underside of the weight and sealed it with matte spray. I covered it with some felt to protect the silver and any surface I lay it on. And just to add a little more detail, I cut out some black vinyl in the shape of a leaf and put it on the top of the dome. If I get tired of the leaf I can change it out to something else!
  This would make a great gift but I plan on keeping and using this myself! Diana
 Now that we have a LARGE new craft store in our little town I have so many temptations every time I go in to get some little thing! The last time I went, I picked up a magnifying glass paper weight. I knew there was something I could do with it! I thought about mod podging it but the curve of the glass would make that difficult.
 Then I remembered I had some silver leaf! Perfect! I applied it to the underside of the weight and sealed it with matte spray. I covered it with some felt to protect the silver and any surface I lay it on. And just to add a little more detail, I cut out some black vinyl in the shape of a leaf and put it on the top of the dome. If I get tired of the leaf I can change it out to something else!
  This would make a great gift but I plan on keeping and using this myself! Diana
Friday, February 25, 2011
Easter Egg Coaster
Snow day equals craft day!!!! While another project is drying, I made up these colorful coasters for Easter time. I am hoping the power of positive thinking brings spring soon. Easy as can be, these coasters go together in minutes. First lay (and I don't mean like a chicken)egg shaped fabric onto felt and then satin stitch around the edges. Then finish off by pinking the felt 1/4 inch from the fabric. Done! And think how cute these with look on the table once winter is out of the way! Diana
 Easy as can be, these coasters go together in minutes. First lay (and I don't mean like a chicken)egg shaped fabric onto felt and then satin stitch around the edges. Then finish off by pinking the felt 1/4 inch from the fabric. Done! And think how cute these with look on the table once winter is out of the way! Diana
Wednesday, February 23, 2011
Monkey Pendant
Just a funny little bit of jewelry I put together a few days ago. I just needed the choker which I pick up this morning! And wait til you hear how easy it was! First of all, the monkey is really a brad from the scrap booking dept of the craft store! He is made out of metal and soooo funny with his wiggly eyes. I snapped off the prongs and glued it to the pendant blank with 6000 glue. Then I applied Mod Podge dimensional epoxy over the monkey, not the blank. It looks so much more substantial now.
 Silly little necklace but I get a kick out of it all the same. Diana
 First of all, the monkey is really a brad from the scrap booking dept of the craft store! He is made out of metal and soooo funny with his wiggly eyes. I snapped off the prongs and glued it to the pendant blank with 6000 glue. Then I applied Mod Podge dimensional epoxy over the monkey, not the blank. It looks so much more substantial now.
 Silly little necklace but I get a kick out of it all the same. Diana
Sunday, February 20, 2011
Bzzzzz
I am such a copy cat. Bakerella did these a while back and hers were so much neater. Literally. Neater. No drips, straight lines, cuter faces. But I am not letting that get me down. With more practice..... These are for the kids at church and I can't wait to see their faces.
 Here is how I will display them. Just a little ribbon around some Styrofoam disks.The cuteness factor is killing me here! Bzzzzzz. Diana
 These are for the kids at church and I can't wait to see their faces.
 Here is how I will display them. Just a little ribbon around some Styrofoam disks.The cuteness factor is killing me here! Bzzzzzz. Diana
With A Cherry on Top
Mmmmm..... Chocolate covered cherry on top of a Bavarian creme filled chocolate cupcake! Add some vanilla butter creme and red sanding sugar. I'm over the moon!
 The cherries were dipped in a mixture of fondue chocolate and chocolate candy coating.
 This looks good enough to eat. And I think I will, thank you very much. Diana
 Add some vanilla butter creme and red sanding sugar. I'm over the moon!
 The cherries were dipped in a mixture of fondue chocolate and chocolate candy coating.
 This looks good enough to eat. And I think I will, thank you very much. Diana
Saturday, February 19, 2011
Chocolate Mint Juniors
Do you love Junior Mints? I do! And here is my version in a mini cupcake.  One bite (or two, if you are being dainty) of mint and chocolate goodness.
 The cake is chocolate, the frosting is a simple butter cream with mint extract and a pinch of green jimmies sprinkled on top. Then I balanced a Junior Mint on it's edge on each little gem. YUMMY. Diana
 One bite (or two, if you are being dainty) of mint and chocolate goodness.
 The cake is chocolate, the frosting is a simple butter cream with mint extract and a pinch of green jimmies sprinkled on top. Then I balanced a Junior Mint on it's edge on each little gem. YUMMY. Diana
Friday, February 18, 2011
Salt Water Fishes
You've seen these before but I have been wanting to do a few for my nieces (one has a salt water aquarium and loves all things ocean!) Won't she be surprised to find out these fishes swim in soap. I got the fish at Pat Catans. Usually you see gold fish in these soaps but I like the tropical fish too.
 The water is kind of cloudy, just like salt water.
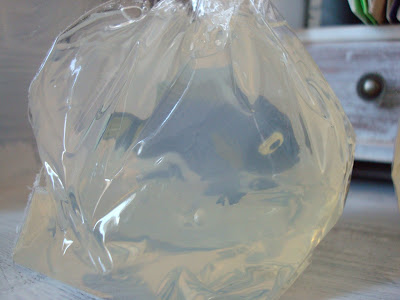 Hope you try this out if you haven't already. Clear melt soap, plastic fish, plastic bag and a little fragrance. Too easy. Diana
 I got the fish at Pat Catans. Usually you see gold fish in these soaps but I like the tropical fish too.
 The water is kind of cloudy, just like salt water.
 Hope you try this out if you haven't already. Clear melt soap, plastic fish, plastic bag and a little fragrance. Too easy. Diana
Wednesday, February 16, 2011
Scripture Covers
I have made these before but I thought I would post this year's Great to Be Eight scripture covers anyway. I used paperback scriptures and covered them in scrapbook papers (cardstock). Such an inexpensive way to make a very personal gift for the eight year olds who will be getting baptized. 


 I did alot of inking this time! I like they way it softens the edges. Diana


 I did alot of inking this time! I like they way it softens the edges. Diana
Tuesday, February 15, 2011
Spice Jar
 Do you shop at the big warehouse stores like I do? One problem is the size of the packaging. Another is the amount of available cabinet space in my cute but small kitchen. So, to free up some space, I am storing the big container of spice in the basement and instead using these sweet little jars I found.
 Not wanting to use paper labels (not able to wash) I made fimo ones instead.
 Then I added a little bee to personalize the jar. To get the punched letters and details on the bee to show up, I baked the white fimo and then washed the surfaces with caramel color paint that I then wiped off. Then I sprayed a matte coating on to set the color. Using 6000 glue, I attached the label and bee to the jar. Diana
Monday, February 14, 2011
Fimo Charms
Today's posts is all about cookies......fimo cookies! I seriously love these little guys! A chocolate creme filled sandwich cookie and a crisp little fortune cookie with a bit of the paper fortune peeking out. And these are tiny,
 I even put a little creme frosting (fimo) in between the cookies! I found the molds on esty and they were only a fes bucks each. Fimo is so much fun and using these molds make it oh so easy too. Diana
 I seriously love these little guys! A chocolate creme filled sandwich cookie and a crisp little fortune cookie with a bit of the paper fortune peeking out. And these are tiny,
 I even put a little creme frosting (fimo) in between the cookies! I found the molds on esty and they were only a fes bucks each. Fimo is so much fun and using these molds make it oh so easy too. Diana
Sunday, February 13, 2011
Valentine Treats
Today at church I received such cute little tokens of friendship! Don't you love Valentine's Day? My mom made these cute little bags full of delicious candies.
 And look how lavish this tiny bow is. Adorable!
 Mary gave out these lovely packages with a vintage looking valentine on the front.
 Inside were paper white bulbs and on the back of the label was the forcing instructions. And look, they already are sprouting.....a promise that spring IS COMING...... How thoughtful. Diana
 My mom made these cute little bags full of delicious candies.
 And look how lavish this tiny bow is. Adorable!
 Mary gave out these lovely packages with a vintage looking valentine on the front.
 Inside were paper white bulbs and on the back of the label was the forcing instructions. And look, they already are sprouting.....a promise that spring IS COMING...... How thoughtful. Diana
Friday, February 11, 2011
Sweet Candle
I saw this cute little silhouette on The Graphics Fairy and thought it would be great on a candle!  And check out the fat kitten hoping for a spill! I printed this on a piece of tissue paper taped to regular typing paper that I then could run through the printer. This did take a few tries before I got a good copy so be patient. I then used wax paper to wrap and hold the tissue paper on the candle. Hold the wax paper tight, keeping your hands behind the candle. Now use a heat gun to melt the image into the candle. The tissue paper will embed itself into the candle! Don't hold the gun too close or in one place too long cuz the candle can melt out of shape. If that happens, use a brayer to push the candle back into shape. As you can see, the image is very crisp and clean, so you can use really intricate designs. Easy, easy, easy! Diana
 And check out the fat kitten hoping for a spill! I printed this on a piece of tissue paper taped to regular typing paper that I then could run through the printer. This did take a few tries before I got a good copy so be patient. I then used wax paper to wrap and hold the tissue paper on the candle. Hold the wax paper tight, keeping your hands behind the candle. Now use a heat gun to melt the image into the candle. The tissue paper will embed itself into the candle! Don't hold the gun too close or in one place too long cuz the candle can melt out of shape. If that happens, use a brayer to push the candle back into shape. As you can see, the image is very crisp and clean, so you can use really intricate designs. Easy, easy, easy! Diana
Wishing For Spring Pedestal
Call it wishful thinking but doesn't this little project lift your spirits? And because I can't grow a house plant to save my life, this little gem is faux and doesn't take any care! The all white color scheme also gives a nod to the snow we still have on the ground outside.
 I started by gluing a wood candle stick to a wood plate.
 Next I gave everything a coat of paint. The tiny pot only got white washed but the pedestal got multiple coats. Then a good spray of matte sealer.
 While that was drying, I assembled the plant. A tiny silk cluster of blossoms and sheet moss glued onto some foam in the pot.
 I think I will be adding a wood disk to the bottom to prevent it being knock over. As it stands, it is a little unstable.
 Just a little something to cheer me up as I pass by.......now I think I will get out my new seed catalog and do a little dreaming. Diana
 The all white color scheme also gives a nod to the snow we still have on the ground outside.
 I started by gluing a wood candle stick to a wood plate.
 Next I gave everything a coat of paint. The tiny pot only got white washed but the pedestal got multiple coats. Then a good spray of matte sealer.
 While that was drying, I assembled the plant. A tiny silk cluster of blossoms and sheet moss glued onto some foam in the pot.
 I think I will be adding a wood disk to the bottom to prevent it being knock over. As it stands, it is a little unstable.
 Just a little something to cheer me up as I pass by.......now I think I will get out my new seed catalog and do a little dreaming. Diana
Thursday, February 10, 2011
Windy Meadows Oil Lamp
A month ago, Mary of Windy Meadows Farm gave a great tutorial on how to turn a mason jar into an oil lamp. I have wanted to make one since but couldn't find the glass sleeve. But a new Pat Catan's craft store opened in our little town and would you believe they carried the part! Check out Mary's tutorial here: http://windymeadowsfarm.blogspot.com/2011/01/mason-jar-oil-lamps.html
 I used rose hips inside a pint jar.
  And when she says trim the wick to 1/4 inch, believe her...........I am lucky I still have eyebrows. Diana

 I used rose hips inside a pint jar.
  And when she says trim the wick to 1/4 inch, believe her...........I am lucky I still have eyebrows. Diana
Tuesday, February 8, 2011
Valentine's Day
Lucky for me, I have a math theory final today which means instead of studying, I've been crafting! My friend Brandy linked to a fortune cookie recipe on her blog. It was a lot of work, but well worth it. The kids had a great time coming up with silly fortunes. Today, they go out in the mail for family and will be packaged up for teachers.

The only adaptation I made was I used a biscuit cutter to form 3" circles of batter instead of 5" circles. I used the biscuit cutter like a pancake form to get perfect circles every time (after a batch of frustratingly uneven circles made by hand).
Little Abby made some valentine bookmarks for her cousins. They are images printed on photo paper, cut to 6"x2". She folded them in half and then attached a magnet to each side to keep them in place. Cute! Her teachers and friends will love them.
~Jennifer
Sunday, February 6, 2011
Sweet Tweet Potholder
I haven't had a new potholder in forever, so today's project was to make MYSELF a new, cute one! How fun to choose colors that made me happy! Happy colors, happy cook!
 Oops. I not sure I can actually use this and get tomato sauce on it. Bummer. Diana
 Happy colors, happy cook!
 Oops. I not sure I can actually use this and get tomato sauce on it. Bummer. Diana
Subscribe to:
Posts (Atom)


